USB 2.0 Extension Cables
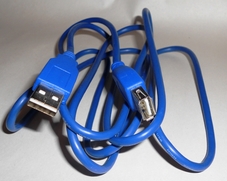
Beyond 16 feet, you will need a cable that will boost the signal in order to avoid losing data or damaging USB equipment. The maximum distance that you can reach by chaining "Active" USB extension cables together is 80 feet. By using 16 foot cables, you can safely chain up to 4 of these cables together without risking data loss or damage to your device (in addition to the 4 "active"extension cables, you will use a regular device cable at the end that can be up to 16 feet; this is how you achieve the maximum distance of 80 feet).
Browsers and viewing Web Pages/Sites

Firefox is a serious competitor to Microsoft's Internet Explorer. It features a faster start up and shut down and it loads many web pages more quickly. You can download it here for free: Mozilla Firefox
Or, if you feel more comfortable having me come to you and showing you additional tricks and teaching you about the different browsers, never hesitate to contact me to set up an appointment. I would be happy to help you!
Websites Scam Alert:

There are sites that target vulnerable people and these threats can come from potentially safe sources like social networking sites and game sites:
Popular games like Farmville and Mafia Wars carry colorful advertisements that entice
people with things such as a "Free chance to win by completing a survey!" What is the goal of the survey? For the user to provide personal information, including a cell phone number and codes, which would be used to charge cell phone bills. The more surveys, the more charges, until the bill comes to your home at the end of the month. Even safe sites have been reported to have lurking fraudsters planting phishing emails, which send you to third-party websites. That "click" can send malware into your computer, grabbing information, including online banking user names and passwords.
In addition to keeping your PC up to date and running daily anti virus scans, do not be tempted with these fraudulent scams. It is unfortunate that we have to deal with these things, but it is also reality, so DON'T BE FOOLED! Be safe and enjoy yourself online.
you can read all about news, tips & scam alerts at www.sitejabber.com
Telephone Tip:
Be aware that it is not always the right thing to do when you call back a telephone number on your cell phone or land line phone - caller id. Someone may be calling you from anywhere and that may not be the number that you would need to reach the person back at.
Therefore, unless the person leaves you the number or advises you
further, think twice about just randomly calling a number on your caller id. Basically, you are wasting your own time and possibly the time of others.
To lock your computer - before walking away...

If you have to leave your computer - either at work or at home and you want to leave all of your programs open - lock it up! This will ensure the safety of your work or personal data.
There are two ways to lock your pc:
1. Hit Ctrl + Alt + Delete - when the windows security box pops up, hit Lock Computer.
2. Hit the "Windows Logo" key on your keyboard + the "L" key.
When you return and are ready to sign back in, Hit Ctrl + Alt + Delete and you will be prompted for the same password that you use to log in to your computer.
How to quickly open the ClipBook Viewer:

To open the ClipBook Viewer - right click on your desktop, point to New, then click Shortcut.
- in the location field, type %windir%\system32\clipbrd.exe
- click Next
- click Finish
and now you can double click the clipbrd shortcut on your desktop to launch the ClipBook Viewer.
OR - you can open your Notepad, click Start, All Programs, Accessories, Notepad and right click and paste and you will see the last text you copied.
Instantly activate a screen saver

In the Search Results window, click All files and folders. In the All or part of the file name box, type *.scr. Then click Search. You will see a list of screen savers in the search results. Pick the screen saver you want. You can preview it by double-clicking it.
To add a shortcut to your desktop, right click the file, click Send To, and then click Desktop.
Now you can instantly start your screen saver by double-clicking the icon on your desktop.
|
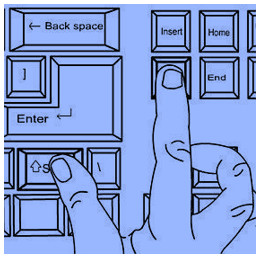
Keyboard Shortcuts: If you are at the top of a page, hold the "Ctrl" button and the "End" button and you will go to the bottom of the page. If you are at the bottom of a page - hold the "Ctrl" and "Home" buttons and you will go to the top of the page. Hold your "Ctrl" button and move the Mouse wheel up or down to enlarge or decrease the size of the type on the webpage you are presently viewing. |
How to set your browser's "homepage"...

Internet Explorer is the free "web browser" that ships as part of the "Windows" Operating System and is one of the most dominant web browsers on the market today.
Here are some other popular "browsers" that are available and free: Safari (from Apple), Firefox (from Mozilla), and Chrome (from Google).
Your "homepage" is the first web page you see when you launch Internet Explorer.
To set your browser's "homepage" in Internet Explorer to the web page where you get your email or to a web page that you wish to visit most often, for example...www.google.com you do the following:
Open or go to the web page that you wish to save as your "Home page", while at this page, click on "Tools" in the menu bar at the top of your screen, then click "Internet Options", next you will see the "Internet Options" dialogue box where you will see a "white" box that says "Address:" to the left.
Click "Use Current", "OK", and close your browser.
Now, re-launch and you will see your "Home Page".
Downloading Pictures from your Digital Camera:

After you take pictures with your digital camera, you may want to copy the pictures from your camera to your personal computer so you can print them, share them with others, and back them up for safe keeping. Once your pictures are on your computer, you can erase them from your camera, freeing up memory so you can take more pictures. You can also view your pictures on a larger screen and decide which ones are worth keeping.
Some digital cameras come with software that helps you copy pictures from your camera to your computer. You can use this software, but you don't have to. Windows XP can copy pictures to your computer without requiring additional software. Here's how to copy your pictures using Windows XP:
1. First connect your digital camera to your computer.
You can do this in two different ways:
• Use a USB cable. Most digital cameras come with a cable that connects the camera to a USB (Universal Serial Bus) port on your computer.
• Use a memory card and memory card reader. A memory card reader is a piece of hardware that plugs right into your computer. You remove the memory card from your camera and insert it into your memory card reader, similar to the way you might transfer a file between two computers using a floppy disk.
Tip: It's usually faster to use a memory card reader to copy your pictures than to connect your camera to your computer with a cable.
2. Once you've connected your camera to your computer or inserted your memory card into your memory card reader, Windows XP will detect the connection and ask you what you want to do with your pictures. If you connected your camera with a USB cable, click Microsoft Scanner and Camera Wizard, and then click OK.
If you are using a memory card reader, click Copy pictures to a folder on my computer using Microsoft Scanner and Camera Wizard, and then click OK.
3. When the Scanner and Camera Wizard appears, click Next.
4. All of the pictures on your camera (or in your camera's memory card) are now displayed on the Choose Pictures to Copy page. By default, Windows XP selects all of the pictures for downloading. If there are pictures you do not want to download, just clear the check box next to those pictures. At this stage, you can also rotate pictures that you took while holding your camera vertically. To rotate a picture, click it, and then click either the Rotate clockwise or Rotate counterclockwise button on the lower-left side of the page. When you have reviewed the pictures for downloading and rotated your vertical pictures, click Next.
5. On the Picture Name and Destination page, type a name for the group of pictures. (This name, plus a number to differentiate each picture, will be applied to each of the pictures you download; for example, if you name the group "Vacation," the pictures will be named "Vacation001," "Vacation002," and so on.) Click Browse, and select a folder in which to save your pictures.
Tip: Create a new folder for each group of pictures you download.
6. If you want to erase the images from your camera's memory card to make space for new ones, select the Delete pictures from my device after copying them check box, and then click Next. The Scanner and Camera Wizard copies the pictures from your camera to the folder you specified and then removes the pictures from your camera's memory card.
7. On the Other Options page, you can choose to publish your pictures to a Web site or order prints. If you have finished working with your pictures, click Nothing, and then click Next.
8. On the final page of the wizard, click Finish. Windows XP opens a Windows Explorer window showing the pictures you downloaded from your camera. Your camera's memory card is now clean and ready to store new pictures. If you connected your camera to your computer using a USB cable, disconnect your camera. If you used a memory card reader, return the memory card to the camera.
Your photos are now stored on your computer, ready for whatever you want to do with them, and your camera is ready to take more pictures. As with any important files, it's a good idea to make backup copies of your photos, in case anything happens to your computer.
The above information was obtained from Microsoft at the following link:
http://www.microsoft.com/windowsxp/using/digitalphotography/takeit/transfer.mspx

